GENEWARS game manual
BFE05100345M
CONTENTS
- Contents
- 2
- Introduction
- 3
- The Aim of the Game
- 6
- The Races
- 6
- Main Menu
- 9
- The Single Player Game
- 9
- Inter-Planetary Navigation
- 9
- The Game Screen:
- 10
- The Game Screen explained
- 10
- Playing the Game
- 11
- Forming The Teams
- 11
- Specialists
- 12
- Buildings
- 15
- Upgrading
- 18
- CREATURES
- 18
- Flora
- 20
- Options Screen
- 22
- The Network Game
- 24
- Playing the Network game
- 26
- Credits
- 27
INTRODUCTION
War. What is it good for? One thing it's certainly not good for is being nice to planets, especially when it's the kind of war that involves vast engines of destruction showering plasma rain onto fragile ecosystems, simply because a Star Frigate Commander doesn't like the look of that bush.
Unfortunately, this is exactly the kind of war that the galaxy found itself embroiled in.
Once the inhabitants of Planet Earth finally got it together enough space travel-wise to explore outside the solar system, they discovered that there were three other races doing exactly the same: the sneaky, reptilian Saurians, the understandably uptight, nasally gifted Schnozzoids, and the curiously laid-back Bohemians. Each of these races being just as self-important, aggressive (except for the Bohemians) and intolerant as the Earthlings, it wasn't long before an intergalactic pagga of quite exceptional proportions kicked off. Advanced technologies previously used in the fast-food, mail-order gizmo and executive leisure industries were swiftly adapted into weaponry of astoundingly destructive properties, and the suzerainty of many hundred previously quiet, green planets was disputed in a most antisocial manner.
Thousands of different species of previously unencountered flora and fauna were rapidly made extinct, which would have caused the scientists involved huge amounts of tears and distress, were they not already too busy grinning savagely at the particularly unpleasant application of the electric corkscrew they had just invented. Still the wars raged on and on, each race so outraged by the others' destruction of an especially beautiful planet with great potential as a tourist attraction that they redoubled their systematic annihilation of every other location that their enemies might usefully inhabit and exploit. Before too long, there were so many charred, blackened planets around that the galaxy was starting to look like a particularly complicated game of monochrome billiards. The casualty list numbered several billion, and four previously proud, advanced and cultured civilisations were rapidly blasting each other back into the stone age.
Eventually, things came to a head when the Bohemian Commander Jean-Luc Pontiac decided that a huge, black monolith he'd just found hiding behind the ninth sun of the Colcombet system was probably hiding Saurian saboteurs. Setting his Lithium Dilator to 'Seriously Upset', he channelled a coruscating beam of incredible power at the object. According to his ship records, he was 'mildly perturbed' when the monolith reflected the beam back at his ship, destroying the crew quarters and killing 40,000 of his friends and colleagues.
The log then went on to reveal how he was 'somewhat surprised' when the monolith began emitting a shrill, keening sound, audible even through the Bohemian Cruiser's triple shielding. Unfortunately, the report was too damaged to reveal how Commander Pontiac felt when a gigantic, glowing alien spacecraft materialised out of nowhere, just like they do in Science Fiction movies with really large budgets, crushing the Cruiser like a particularly small, easily crushed bug.
This rather dramatic event heralded the return to this dimension of the mysterious Ethereals, incredibly advanced beings who'd got rather bored with this somewhat mundane Universe several billion years ago, and so legged it to somewhere altogether more conducive to their peaceful, ordered and highly sophisticated temperaments. However, considering themselves intergalactic guardians of no small order, they had left a number of suitably photogenic warning devices behind, of which the monolith was one of the more mundane.
The Ethereals really weren't too impressed by the havoc the warring races had inflicted on what had previously been a rather picturesque part of the multiverse, and quickly started setting matters to right. Suddenly, all the different races found themselves divested of all their weaponry quicker than they could say 'Hey, haven't I seen you on a T-shirt somewhere', leaving them with not so much as a rusty penknife. Then, in a psychic communication audible to every (surviving) member of the four races, the Ethereals clearly and calmly dictated what was going to happen now.
A court session was convened and the often quirky Ethereals appointed a particularly evolved kangaroo as judge. The surviving members of the four warring races were in the dock for their crimes against the multiverse. Lawyers were not an option that the defendants had; since this lifeform was now extinct owing to the advent of far cheaper, more logical and better dressed computer alternatives. The marsupial Law Giver meted out a heavy sentence (he had not enjoyed his enforced emigration from the Antipodean sector of the planet Earth), and the upshot was that these sworn enemies would work together in their inter-galactic community service, the crux of which would revolve around the re-colonisation of planets affected by their vandalistic antics.
However, as the Ethereals really don't trust any of these races to act in a mature and enlightened manner on completion of their task, they decided that every surviving member of the formerly warring races will be subject to the infamous Adami Process, a technique pioneered by the Ethereals which removes all the subjects negative traits and renders them harmless, mindlessly happy and puppy-like. Because the Etherals like a good competition, the best colonisation team will forgo the Adami Process and be given a second chance using the wisdom and awesome powers of the Ethereals. This is the meal ticket that every colonisation team is after so don't expect it to be easy, weapons or no, these generals-turned-creators are conducting a war the likes of which has never been seen in this galaxy or any other!
THE AIM OF THE GAME
The Ethereals have supplied each colonisation team with appropriate technology to allow them to address the rather weighty task of repopulating an entire planet from scratch. Most significant of these is the recipe for GOOP, an extremely concentrated carbon-based substance which can be used as a highly versatile building material or, more importantly, to synthesise life-forms from genetic blueprints. Essentially this is the "currency" that you will be working with; buildings and creatures all require a certain number of GOOP units to be constructed. With this material and the Ethereals' technology, you have all the resources necessary for this laborious penance. You should bear in mind that your orders, given at the beginning of each mission by the Ethereals, should be followed rigorously, since transgressions will be punished summarily by the all-powerful grey guardians. A record of your progress is shown on the game screen at all times with a red and green "Bad-o-meter" showing how the Ethereals view your efforts. You are alerted when the Ethereals are about to arrive and should ensure that you're keeping your nose clean; they are notoriously bad tempered if you are not working in a manner they find acceptable. If they are pleased with your efforts they may reward you, but equally they will punish you royally if they think you aren't up to the job.
You should always ensure that you busy yourself in your capacity as a creator of life on the planets and minimise the number of Bad acts you commit. When you have completed your mission the Ethereals will contact you and give you your next mission. Listen to their orders carefully since your survival as a free-thinking biped as opposed to a pulp-headed puppy-like slave depends upon it.
THE RACES
As you already know the Earthlings are not alone; they have grudgingly shared the galaxy with three other races for thousands of years. The other races are: the Saurians, a subservient but sly race of reptilian rapscallions; the Bohemians, a laid-back and chilled out group of cats; and the Schnozzoids, the shy, uptight Barry Manilows of the humanoid world. The only other race, which you won't be able to control, is the Ethereals - a group of beings who really are too highly evolved to answer to a mere Earthling like yourself. It is these Ethereals who have brought the four warring races together to clean up the galaxy. Each of the races have a maximum ability level and these are detailed below.
EARTHLINGS:

As highly evolved humanoids the Earthling characters are fast on their feet, have good eyesight and as they are, by nature, inquisitive their research capabilities are high. Of course they are not renowned as the most caring masters of nature after their self- destructive antics on planet Earth and are therefore highly regarded as a food source by the numerous creatures of the quickly evolving new planets. Finally, using Monolith upgrades the human specialists' maximum ability is 100% and maximum strength is 70%.
SAURIANS:

The Saurians are a very hardy and tough race who can handle a lot of abuse at the hands (or claws) of other lifeforms. However, their bulkiness means that quick, sprightly or nimble are not in their vocabulary; basically they're real slow-coaches. The Saurians, like Earthlings, are not known for their love of nature and unluckily for them Nature knows it. They, too, will come in for a lot of stick from the creatures they meet. Finally, using Monolith upgrades the Saurian specialists' maximum ability is 75% and maximum strength is 100%.
BOHEMIANS:

These humanoids are distantly related to Earthlings but they have evolved in a far more cosmos-friendly manner. Easily mistaken for Techno-hippies, they really are in tune with both nature and their cosmic rays. This affinity with nature puts them a lot further down a creature's lunch menu and thus allows them to travel around (relatively) unmolested. When they do get injured their knowledge of crystals and ley lines allow them to heal quicker than the other races. The Bohemians can achieve a maximum ability of 75% and a maximum strength of 65% using Monolith upgrades.
SCHNOZZOIDS:

The Schnozzoids are renowned throughout the known galaxies (and the unknown galaxies for that matter) for their prodigious facial protuberances (large hooters!). This has resulted in the publication of huge volumes of joke books and much general ridicule. The constant embarrassment has caused them to evolve a hi-tech paper bag to hide from derision, this takes the form of a cloaking device (actually, they tried real paper bags first but they used to get soggy and fitting in their noses was a constant problem). While this means people don't laugh at them so much it also allows them to move around more freely. By the same token, though, watch out for attacks by shadowy figures with large noses from enemy bases. Or they might even be totally invisible. The Schnozzoid specialists' maximum ability is 75% and maximum strength is 90% using Monolith upgrades.
THE ETHEREALS:

You are subject to the rule of the Ethereals and they will spend a lot of time observing your inter-galactic community service. When they are happy, sparkles will emanate from whatever it is that they are pleased with, and skulls will be emitted if you are doing something Bad. The colours of these skulls and sparkles depends who the subject belongs to.
On the status bar there is a Good (green)/Bad (red) monitor called the 'Bad-o-meter' (see Bad-o-meter, surprisingly) and this will give you an idea of how the all- powerful beings view your efforts. If the monitor is fully green then they will be Happy enough to give you a gift of great power. They may reward you by placing a Monolith in your base area, you'll know it by its hi-tech black appearance. Allowing a lifeform to interact with (i.e. touch) the Monolith will give that individual extra powers, and in the case of creatures will give the whole species a special power...
Conversely if you move into the red section of the Bad-o-meter then the Ethereals will do something nasty to you. Even though they are extremely evolved they do enjoy doling out acts of wrath and will readily subject failed commanders to the Adami Process! Above all you should remember the sad story of Commander Jean-Luc Pontiac and the results when he upset the Ethereals (see Introduction), they really don't think in terms of fair and unfair, they merely decide whether you are succeeding or failing and they will act accordingly. The more Bad you are, the more the Ethereals will smite you - either until you are dead, or the Bad-o-meter registers neutral.
MAIN MENU

This is the screen from which you'll start your hybrid hi-jinx. Left-click on an option to select it. The options are as follows:
Single Player: Starts the Single Player mission game. See The Single Player Game section for more details.
Network: Allows access to network multiplayer (only appears if GeneWars detects a suitable IPX Network connected to your PC). See The Network Game section for further details.
Options: Brings up the Options screen. See the Options section for more information.
Quit: Quits the game, and returns you to the Operating System.
THE SINGLE PLAYER GAME
The Single Player game charts the progress of the GeneWars from the outset of the Ethereal community service project. Taking the part of the commander of a colonisation team, you have been detailed to resurrect 24 planets from the barren ashes to which they have been reduced. To begin with, you'll need to experiment with some of the hi-tech equipment the Ethereals have given you, and to initiate your research into the more basic lifeforms you'll be required to create. Of course, sooner or later, you're going to encounter your fellow colonisers (your 'opponents'!). When this happens deal with them as you see fit.
INTER-PLANETARY NAVIGATION
Your able pilot will take you from one barren planet to another; all you have to do is left-click and he will do the rest.
THE GAME SCREEN:
THE GAME SCREEN EXPLAINED
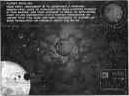
BASE POWER DISPLAY:
At the top of the status bar is the base power display. Initially this will be blank, but as the base is powered up this will give an idea of your power needs.
SCORE-O-RAMA:
The pink bar here shows how much of the current mission you have completed. Later, you may build a Tech Facility which will show you how your opponent colonisation teams are doing. In any case a flashing marker will appear above whichever crew is doing the best (i.e. a flashing pink marker above your pink bar on the Score-o-rama means you are winning!). The other team colours are green, purple and orange.
BAD-O-METER:
This displays Ethereals view of your efforts. Any red and you're in for trouble, all green and they might be kind to you.
INDIVIDUAL SPECIALIST MONITORS:
There are five monitors and each of your team (up to a maximum of five) will be shown here. The specialist in the action circle will be highlighted. Left-click on a monitor to select him, right-click to zoom in. A static effect on a monitor means that specialist is talking to you; if the static is red then he is taking damage and needs help. Usually this will be accompanied by frenzied screaming, just in case you're in any doubt.
ACTIVATE/DEACTIVATE ACTION TOGGLE:
Left-click this to halt a building or specialist in progress, or start it going again. Also, click deactivate to make otherwise diligent and dutiful creatures under your command follow their own instincts.
ACTION SCREEN:
This screen shows the item/lifeform last selected. Left-click on the screen to zoom in on the action.
HELP TOGGLE:
Left-click to activate help prompts, which will appear every time you select anything. Very useful when you first start playing.
STRENGTH LEVEL:
Indicates the current strength of the lifeform/structure in the Action Screen. Point the cursor at the bar to find the numerical reading.
HEALTH LEVEL:
Indicates the current health of the lifeform/structure in the Action Screen. Point the cursor at the bar to find the numerical reading.
MULTI LEVEL:
This bar has two uses: if a creature is in the Action Screen then this will display its level of genetic evolution. If the Botanist is in the Action Screen then this will indicate the number of seeds he has. For other specialists, this bar will remain empty.
OVER-VIEW MAP:
Shows a small scale view of the planet. Allows you to zoom in on a particular point quickly.
FIELD OF PLAY:
Where it all happens!
PLAYING THE GAME
STARTING OFF
When your colonisation crew arrive on the planet surface you will want to select them individually to undertake tasks, the first of which is to establish a base using the Engineer specialist and a growing area using the Botanist (see Specialists section).
To select an individual specialist: Left-click the cursor on their respective icon on the status bar or point the cursor at the specialist on the game-field and left-click. Once selected a flashing arrow will appear above him, and he will appear in the Action circle at the bottom of the status bar.
To move an individual specialist: Move the cursor to the new location and left-click.
To de-select an individual specialist: Right-click. Alternatively, left-click on another individual or building.
To select a group of specialists: Control + left-click and drag and a white rectangle can be used to surround the group, when you are happy you should release the left mouse button. A flashing arrow will appear above those specialists so selected.
To move a group of specialists: Move cursor to new location and left-click.
To de-select a group of specialists: Right-click. Alternatively left-click on another specialist or building.
Note: When de-selecting an Engineer, always right-click the mouse. If you try to left-click on a building, the Engineer may try to upgrade this building instead of you selecting the building.
FORMING THE TEAMS
Your job is to select the best men for the job by taking account of the races' various strengths and weaknesses. Individual specialist skills also vary when you select crews for later missions. Their name and % expertise shows when you point the cursor at them at the beginning of later missions and in earlier missions if you build a Landing Pad. To begin with, however, those lovely Ethereals will select your team for you.
SPECIALISTS
These are the guys you are relying on to help you bring life to the devastated biospheres. Their training at the hands of the Ethereals has given them the tools and techniques necessary for success. Their expertise will allow you to build, research, plant, harvest and herd in your own Garden of Eden. Remember, they are still learning and, if you decide, then letting them interact with The Monolith (see The Ethereals section earlier) will augment and improve their skills. The more skilful they are the better they will perform, so look after them!
ENGINEER:

Hold on to your hard-hats, this guy has got a large tool-box! He builds and repairs structures. He can also carry out structure upgrades.
To build: Left-click on one of the building options that appear on the status bar when he is selected. As the game progresses the choice will grow so don't neglect the scroll arrows above the building menu.
To repair or carry out upgrades: If the cursor is pointed at a building that needs repairing or upgrading, a revolving tool icon will appear. Left-click to commence repair/upgrade. (See the Upgrading section below.)
To destroy buildings: Control + left-click and a dynamite icon will appear. Place this over a building you wish to destroy. Bear in mind that the Ethereals don't like Humanoids who act in such a destructive way, especially against other team's bases!
Note: This is not considered a bad act if you wish to destroy your own building.
GENETICIST:

Studies new creature types, enabling their genetic engineering at the Gene Pod. He can also act as a surgeon-in-situ effectively healing lifeforms under your control. He possesses a stun-gun-cum-invasive surgery tool and a medicine box.
To research a creature: Placing the cursor over a creature which is relatively unknown will turn the cursor into a magnifying glass. Left-click to commence research. A % reading will appear above the geneticist's head. A 50% knowledge reading is enough to build creatures in a Gene Pod but of course you could try with less! The extra 50% will affect its size, strength, stamina and intelligence.
Remember: a research level above 50% is not possible with a Gene Pod. To do more research a Gene Machine or Gene Lab is required.
To heal a specialist or creature: Any specialist or creature with less than full health can be Healed. A revolving red cross will appear over any specialist or creature so affected. Left-click to send the Geneticist to heal them.
To stun a creature: The Geneticist can also use his research equipment to stun creatures he has already researched. In this case blue cross hairs will appear over the targeted creature. Left-click to select a creature for the attentions of the stun-gun.
BOTANIST:

Pure David Bellamy. He plants flowers and trees, collects seeds and studies the needs of different plant species for more efficient farming and colonisation. Remember that without plant matter and a diversity of flora (see Flora section) you will find difficulty in pleasing the Ethereals. Don't let him stand idle for long.
To plant seeds: Select a plant from the botanists plant bar and left-click. Then the area to be planted should be selected on the game screen. An area will be highlighted with a growing plant graphic at its centre. Left-click will put the botanist to work planting this area.
To harvest seeds: Left-click on a plant to put the Botanist to work harvesting seeds, a highlighted area with a plant being plucked from the soil graphic in its centre will appear on the plant.
Remember: If his seed pack is full then he can't harvest any more.
To cut down plants: Hit Control + left-click and he will get out a chainsaw for some serious deforestation. Watch out for the Ethereals, who are likely to frown upon such Bad actions.
RANGER:

Essentially a shepherd brought bang up to date with a variety of techno-tools at his disposal. He controls feeding, fighting and mating tendencies of creatures, as well as maintaining population levels by culling. When you select a ranger a choice of icons will appear on the status bar and you should choose the task from the list below:
To encourage feeding: Left-click on the feeding icon (indicated by a knife and fork), and then move the cursor over to the creatures you wish to feed. A revolving crook will appear along with a circle marking the range of the Ranger's influence. Make sure all your required creatures are within this range, then left-click to initiate feeding.
To encourage fighting: Left-click on the fighting icon (crossed swords), and then move the cursor over to the creatures you want to shepherd. A revolving crook will appear at the centre of a highlighted area, which marks the zone in which your animals will fight. A simple left-click will initiate enhanced fighting, and the creatures within the zone will become more aggressive and powerful. Of course, your creatures will have a good go at trouncing the enemy anyway, Ranger or not, but this way you can give your creatures an unfair advantage.
To encourage mating: Unlike fighting or feeding enhancements, however, it is necessary for your Ranger to be around in order for your creatures to mate. They are inherently scared of each other in this way, you see - and you probably would be too, given some of the bizarre creatures you're likely to be making in this game. Left-click the mating icon and a revolving crook will appear instead of your cursor. Surround those creatures in mating season, indicated by a red heart above their bodies, and left-click to become a futuristic Cupid!
To stun creatures: Left-click on a creature, and your Ranger will attempt to stun the creature. A blue crosshair will appear before you left-click and the creature will turn white while stunned.
Note: the stun shot only lasts for a few moments.
To kill or cull creatures: Control + left-click will let him shoot enemy creatures with his ray-gun and allow him to cull your own creatures. Watch out for the Ethereals when doing this; they are likely to get upset!.
BUILDINGS
The missions cannot be completed without the construction of buildings allowing the efficient running of the burgeoning biospheres. Your engineer is essential for the construction of any building.
Note: The Ethereals may provide certain structures initially on some missions.
EXTRACTOR:

Mines raw minerals and converts it to GOOP. This then allows you to build other buildings as well as creating creatures in the Gene Pod. The amount of GOOP that you have will be displayed on the status bar (see The Game Screen explained).
Note: This building must be constructed before any other buildings may be built.
FIRST STAGE POWER DISTRIBUTOR:

Channels power from generators to nearby structures (within power range marked by lightening bolts). Integral fissile material provides just enough power to operate itself and one Extractor. When you build other structure ensure they fall within the boundaries marked by little lightning bolt icons.
Note: This building can be upgraded to increase its effectiveness. (See the Upgrading section below.)
PHOTON PROCESSOR:

Absorbs certain wavelengths of stellar energy reaching the planets surface and converts it into electrical power essential to the operation of a base. You must build a First Stage Power Distributor before you can build Photon Processors.
Note: This building can be upgraded to increase its effectiveness. (See the Upgrading section below.)
GENE POD:

Enables the breeding of basic drone creatures from GOOP. To begin building a creature left-click on the gene pod, then left-click on the red initiation button on the status bar. The Gene Pod control screen will display the attributes of the clones you are creating. The list of attributes is as follows:
Cost: How many units of GOOP to create one creature.
Str: The creature's relative strength.
Def: The creature's relative defensive skill.
Spd: The creature's relative speed.
Aware: The creature's relative awareness.
Note: This building can be upgraded to increase its effectiveness. (See the Upgrading section below.)
Note: You must build a Gene Pod before you can build any of the buildings listed below.
RECYCLING PLANT:

Prevents the waste of dead flora and fauna by converting them back into GOOP. You should let the mules do the donkey work. The Ethereals will look kindly on you if you go green.
Note: This building can be upgraded to increase its effectiveness. (See the Upgrading section below.)
GOOP VAT:

Stores excess GOOP until needed allowing efficient operation of the base. You must build a Recycling Plant before you can build GOOP Vats.
PULPER:

Extracts cellulose from wood to produce upgrade mouldings. Use them in conjunction with the Crab lifeform to upgrade your buildings. Make sure there is wood in your Pulper before you attempt to upgrade.
Note: This building can be upgraded to increase its effectiveness. (See the Upgrading section below.)
LANDING PAD:

Enables crew transfers both to and from orbit via rocketship. Left-click on Radar component of the Pad and you can select crew for the continuing colonisation of the planet from the status bar. Left-click on the red Action button at the bottom of the window and they will be whisked to your landing pad ready for you to give them jobs.
UPGRADING
Several of the buildings can be upgraded. This is an involved process that requires an Engineer, a Pulper and sufficient power for the Pulper, at least one mule, and at least one crab. The process works as follows: the mule will ferry plant material that it has harvested to the Pulper, the Pulper will then use this to produce upgrade mouldings, the crab will ferry the upgrade mouldings to the Engineer and will also assist the Engineer in construction.
Note: The higher the Engineer's skill, the faster the Upgrade process will go.
OTHER BUILDINGS
After the first few successful missions, the Ethereals will enlighten you to other technologies. This will enable you to build other types of buildings. You will have to learn about these from the Ethereals!
CREATURES
For the first levels of the game you need only concern yourself with producing pure-breed, natural creatures. However, later on you might get to crossbreed these creatures, but first you must gain an understanding of the naturally occurring species on the various biospheres the Ethereals will send you to.
Note: as described earlier, if you are lucky enough to get a Monolith as a gift from the Ethereals, you can use it to upgrade your creature species and give that creature a special power. The special power of each creature is in bold below.
CONTROLLING CREATURES:
Creatures are controlled in the same way as the specialists, but to select a group of creatures when there are specialists in the same area Alt+left-click+drag will select only creatures. To give a selected creature (or group of creatures) a task move the cursor to the relevant item (i.e. a field of Terrinium Bulbs) and an action prompt will appear depending upon what that creature's particular skill is (in the case of the mule an axe icon will appear and the mule will collect plant matter for the recycling plant). Left-click when this icon is showing to initiate the task.
MULE:

The work-horse. An improbably strong, sometimes docile creature especially useful for dragging dead plant and animal matter back to the Recycling Plant. The special power they receive is a kick like... well... a mule!
CRAB:

A tough builder drone, especially adept at structure upgrading. It is at home on land or in water but is indigenous to deserts. This customer's special power is a heavily armoured carapace which will deflect shots fired at it. Cool!
FROG:

An amphibian creature which is an ideal scout, though not very tough or strong, but it can jump out of trouble. Its special power is the ability to damage creatures, specialists and objects with its noxious spit shots.
BIRD:

This avian creature is very mobile, having the gift of flight. Its speed is second to none and it is very useful as a scout over all terrain. When equipped with a special power, it inflicts damage on other creatures and specialists with a vicious dive attack.
DINO:

A huge reptilian capable of mass destruction. However, they are rather temperamental and will turn on their creator if provoked. Be careful. If you choose to give the Dino a special power, it will gain an awesome fire-breath, in which case you should be especially careful. Don't let them loose near trees, unless they belong to an enemy.
GENE POD RESTRICTION:
All the above creatures can be constructed in the Gene Pod. However, if you manage to research hybrid creatures you will need to upgrade to the Gene Machine or Gene Lab.
HYBRID CREATURES:
When two other different creatures mate, the offspring of these creatures may be a hybrid. For example, a mule and a crab can mate to produce a crabomule. The hybrid creatures have the normal abilities of both parents. Thus a crabomule could assist the Engineer in upgrading or it may harvest trees for recycling or pulping. Each type of hybrid creature is considered its own species. Hybrids do not automatically get a special power, even if the parents' species were upgraded. Thus to upgrade crabomules with a special power, you must walk a crabomule through a monolith. You will be responsible for discovering the hybrids' special powers.
FLORA
Without plants, your Edenic efforts will come to nought. You will rely on the skills of your Botanists to find new plant life to cultivate, harvest and of course re-plant. Only sustainable methods of farming will be tolerated by the Ethereals. The variety of plants that you will encounter will have different climatic requirements and you should try to find the best plant for each area. Some plants are better providers of GOOP while others may offer good protection from would-be attackers. Thankfully, there is a way of you checking this information before you begin planting:
PLANT INFORMATION:
After your Botanist has harvested a crop of seeds from a new species of plant, an icon representing that species will appear in the Botanists panel. Underneath it you will see a coloured disc, representing the type of planetary surface which this plant will revel in. Further information can be gained from these mysterious symbols to the bottom-right of the icon:
SQUARE: Food value of plant. The size of the square is proportional to how much energy a creature can get from eating it.
TRIANGLE: Wood value of plant. The size of the triangle is proportional to the quantity of wood which can be milled from the individual plant.
DOT: Number of seeds required to create each individual plant.
PLANT TYPES:
The selection of species below are simply those from the early stages - you'll have to learn about the rest for yourself!
TERRINIUM BULB:

Good for planting on grassy surfaces, the bulb is ideal for the early Botanist.
PHYLAX ROOT:

Grows nicely on grassy surfaces, a fast grower that offers good nutritional value to creatures.
WAXX LEAF:

A good grower, particularly fond of grass. It can reproduce very quickly given the right conditions.
HINTS
If you are having difficulty on the first few levels then the section below is for you. Don't read this if you want to complete the levels and discover the techniques of pleasing the Ethereals yourself.
LEVEL ONE: EXCELAND.
Instruct your Engineer to start building the base immediately. There is only one mineral patch so start there and work outwards. If you use your Geneticist, be careful as it is all too easy to get him killed by the indigenous Mules that are located to the West. The best bet is to try and lure just one of them away before you research, as a single Mule can easily be stunned by a Geneticist.
LEVEL TWO: KRELL.
Try to work up to a Genepod as soon as possible. You will need an Extractor, First Stage Distributor and a Photon Processor first. Your Botanist should be planting around the base and harvesting any new plant types he sees. Use the GOOP from the Extractor to make as many Mules as you can. Take this opportunity to ensure that your Mule research is up to 50% (It is impossible to research any higher than this at this stage). When the Ethereals next arrive, send your entire Mule army to the marked Zone and wait.
LEVEL THREE: MADAMI.
As your base is pretty much established, all you really need to worry about is getting the GOOP cycle going. Get your Genepod and Recycler up and running as soon as possible. While this is happening, your Botanist should be replacing his seed supplies with those for the new Root plant. These are a more efficient grassland plant than the Terrinium Bulbs. Your Geneticist is not so useful on this level as by now you should have Mule research at 50%. Use him in emergency to defend the base from enemy attacks. You will need to make a GOOP Vat or two to hold the right amount of GOOP to win the level. You will also need around 5 - 8 Mules to work the forests. Try to let the Roots get established before unleashing your recycling horde. There is another base on this level but it is largely inactive. Explore it if you wish, maybe even practise an assault on it. The base isn't a threat to you, though.
LEVEL FOUR: ROACH.
The Zones on this level will be contested by another player, so you should be prepared to act fast. Again, getting your Genepod up and running is the top priority. A core of Mules should be used to maintain the GOOP cycle and defend the base, while a larger group should be assigned to go after the Zones and kill any enemy Mules they find. Just to the North East of the base is a group of indigenous creatures that should not really be angered; it is more hassle to try and deal with two different foes. Your Ranger should be used alongside your Geneticist to protect the base, as this level will be over before you get a breeding programme underway. Be warned that letting the computer player deal with the Zones will result in the Ethereals punishing you for not pulling your weight. Watch the direction the Ethereal Scouts travel when they arrive - this shows which zone you should be concentrating on first.
LEVEL FIVE: BROWN.
From here on in, it starts to get a bit tricky and even more interesting. This is the first time you get to pick which particular Specialists you take to the surface of the planet. Don't waste your best Specialists here, unless you are sure you can handle it. As it's a Zone mission, there is plenty of opportunity to upgrade them - just make sure that you select at least one of each type.
You should dispatch your Geneticist almost immediately to the Zone in the North East. Here he will find a herd of indigenous Crabs which he should research as much as possible. Build one Extractor in the middle of the closest mineral patch and build a Distributor mid-way between the two mineral patches (making sure that the first Extractor is in range).Finally build a second Extractor on the Northernmost mineral patch. Two Extractors should provide you with a constant GOOP supply in the early stages; they will also increase your storage capacity and make base building much easier. Your next problem is dealing with attacks. There will be Mules (and indigenous Crabs if any are left) approaching from the Zone, plus Crabs sneaking through the water to the South. Note that when creatures are underwater they do not appear on the scanner map. You should try to establish a base defence force of several creatures, ideally Crabs. Position them in such a way that they will be in the path of advancing creatures; that way they should automatically intercept any attackers.
When the first Zone is depleted, another one will appear. It is quite near the enemy base, which gives him a big advantage. Immediately move the Mules that you used in the first Zone (you were responsible for the Zone depletion, weren't you?) up to the second. This can be reinforced by Crabs which you can send through the water (a more direct route).There is another plant type here, too It's a more efficient version of the Bloom for the desert, but it means your Botanist will have to leave the safety of the base area. This is also the first level that you will be able to get Hybrids (cross-bred creatures) and upgrade buildings. Hybrids aren't really a problem, but upgrading buildings can be quite tricky. Just make sure your Pulper is full, and you have at least three Crabs and three Mules. If you do upgrade your Genepod, you should try to research all available creatures to the new limit of 75%.
LEVEL SIX ONWARDS:
You will usually have to act fast. Get your base established quickly, and get as many defensive creatures out as possible. The other levels become a lot easier if you attempt to neutralise the enemy bases early on, although this is not always possible. Finally, good luck and happy colonising!
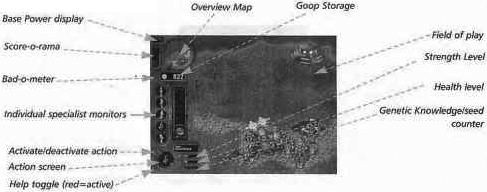
OPTIONS SCREEN
THE NETWORK GAME
The Network Game allows you to play GeneWars against your friends and/or colleagues via your IPX network.
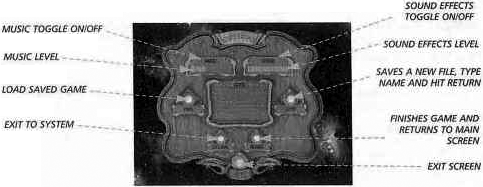
If you have access to an IPX network, this is how to connect and play. Load the game as normal. GeneWars will automatically detect the network and bring up the Network option on the Main Menu. Left-click on this to access the Network screen:
NAME ENTRY
Left-click on the area displaying the current name to personalise your character and strike fear into the hearts of your opponents with a suitable moniker.
JOINING AN EXISTING SESSION
All sessions are displayed in the chat area of the screen. These will consist of the first eight characters of the host player's name. Select which session you would like to join with the left mouse button and click on Join. You will now be part of that session and the chat box will change to display the other people also currently in the session with you.
WHO AM I?
Your name will appear in the top of the chat box surrounded by a coloured box. This box shows you your team colours and can be used to identify both your specialists and creatures in the game. Anyone else who is also in the session will have their own colour for you to identify them by and develop healthy vendettas.
START A NEW SESSION
If there are no sessions currently available then you will have to create one yourself and hope other people are kind enough to join. Left-click on the New button. This will automatically set up a game for your adversaries to join.
LEAVING A SESSION
Competition too rough for you? Cold feet? The pre-match boasting and threats got to you? Left-click on the Quit button to immediately leave the session and be taunted as a coward for the rest of your natural life.
CHATTING
Whilst you are part of a session you can chat to all of the other people involved simply by typing. Anything you type will automatically be displayed in the chat box next to the icon of your colour for all to see. Hit Return to clear the line. It is a wise idea to have a few taunts sorted out before you start playing.
LEVEL SELECTION
There are eight different levels to play in this mode but only the host can choose which one will be played next. To select a level, left-click on the arrows to either side of the level name.
NUMBER OF PLAYERS
The number of players currently in the session is displayed in two ways. Firstly all player names will be visible in the chat box and secondly, a row of specialists appears below the chat box. The number of specialist icons indicates the number of people in the session.
CREATURE ADVANTAGE
Before you start the game you can also choose an advantage to have over the other players. These advantages take the form of extra research of a single pure breed creature type. Select your creature from the four available (Dino, Crab, Frog and Bird) by left-clicking on the arrows to either side of the creature graphic. The creature type you choose will start out at 50% research and have its special ability activated. Choose wisely!
STARTING THE GAME
When all players are ready, the host should left-click on the tick button and let the carnage commence.
LEAVING THE NETWORK SCREEN
Ideal for total cowardice. Click on the cross icon to return to the title screen.
PLAYING THE NETWORK GAME
Thankfully, playing the Network game is near-identical to playing the Single Player game - so for controls and screen layout, see the Single Player Game section above.
CHATTING TO YOUR ADVERSARIES
The function keys F1 - F4 are used within the Network game to 'chat' to your opponents. Hit the key which corresponds to your chosen opponent, then type a line of text followed by Return to send it. There are no rude word checks, so type anything you like. If you want to send a global message to all of your opponents, hit the function key which corresponds to your own character, and then type, ending with Return.
WINNERS AND LOSERS
The Winner of a Network multiplayer game of GeneWars is the player who does one of two things most effectively, depending on the chosen level. If the level contains Ethereal Zones, your objective is to score as many points in those zones as possible. Preferably more than your opponent, of course, so another objective is to prevent your opponent from scoring. More simply, if there are no Ethereal Zones on the level, your objective is to crush your opponents using any means necessary. Simple eh?
CREDITS
DESIGNED BY BULLFROG PRODUCTIONS LTD.
'GAMES THAT DON'T SUCK'
VENUS DEVELOPMENT TEAM
Management:
Les Edgar, Peter Molyneux, David Byrne
Project Leader:
Richard Reed
Programming:
Richard Reed, Alex Trowers, Bjame Rene, Sean Cooper, Andy Nuttall, Andy Cakebread.
Lead Artist:
Jon Farmer
Artists:
Neil Kaminski, Matthew Wee, Fin McGechie, Mark Pitcher, Stuart Black, Chris Hill, Paul McLaughlin, Eoin Rogan, Steve Wilding, Randall Ho.
Music and SFX:
Russell Shaw
Audio Technical Support:
Peter Doidge-Harrison
Producer:
Andy Nuttall.
Level Design:
Alex, Shin Kanaoya, Natalie White
Scripting:
James Leach, Sean Masterson, Neil Cook
Network support:
Mark Lamport
Engine Design:
Glenn Corpes
Libraries And Tools:
Mark Huntley, Alex Peters, Rick Heywood
Tech Support:
Kevin Donkin, Mike Burnham
Testing Manager:
Andy Robson
Lead Testers:
Steve Lawrie, Nathan Smethurst
Playtesters:
Kevin Ashworth, Paul Boulden, Jeff Brutus, John Burton, Charles Edwards, Daniel Farley, William Goldsworth, Kauskik Gupta, Ricky Haggett, Wayne Imlach, Amir Ismaiel, Darren Jones, Paul Londei, Toby Older, Tristan Paramor, Kevin Phillips, Dean Swift, Dave Weeks, Chris Winfield, Idwal Wynn-Jones, Alex Wingrove, Guilherme Xavier
Documentation: James Lenoel & Matthew Miles Griffiths
Documentation Layout: Caroline Arthur Production: Heather Clarke
Quality Assurance: Simon Ranee
Marketing: Sean Ratcliffe, Pete Murphy PR: Cathy Campos Localisation: Carol Aggett, Petrina Wallace, Catherine Guerin, Bianca Normann, Julio Valladeres, Maria Ziino Niclas Nordlander Administration: Audrey Adams, Emma Gibbs, Jo Goodwin, Sian Jones, Kathy Mcentee Thanks To: Mark Adami, Dennis Alderton, Jonty Barnes, Andrew Bass, Michael Willis, Peter Blow, Gary Carr, Martin Carroll, Dene Carter, Simon Carter, Matthew Chilton, Adam Coglan Glenn Corpes, Alex Cullum, Annette Dabb, Dianna Davies, Tony Dawson, Ben Deane, Mike Diskett, Vincent Farquharson, Steve Fitton, Lucia Gobbo, Alex Godsill, Mark Healey, Richard Heywood, Stephen Jarrett, John Kershaw, Ken Malcolm, Barry Meade, Steve Metcalf, Adrian Moore, Barrie Parker, Jon Rennie, Jo Rider, Saurev Sarker, Ian Shippen, Carsten Sorenson, Mark Stacey, Ian Shaw, Guy Simmons, Dr Gary Stead, Jan Svarovsky, Darran Thomas, Mark Webley, Matthew Whitton, Alan Wright and that poor soul Alex Peters
Special Thanks To: Martin Bell, Stuart Black, Tony Cox, Mike Man, Matt Sullivan, Rajan Tande Package Design: Caroline Arthur, James Nolan
NOTICE
ELECTRONIC ARTS RESERVES THE RIGHT TO MAKE IMPROVEMENTS IN THIS PRODUCT DESCRIBED IN THIS MANUAL AT ANY TIME AND WITHOUT NOTICE. THIS MANUAL, AND THE SOFTWARE DESCRIBED IN THIS MANUAL, IS UNDER COPYRIGHT. ALL RIGHTS ARE RESERVED. NO PART OF THIS MANUAL OR THE DESCRIBED SOFTWARE MAY BE COPIED, REPRODUCED, TRANSLATED OR REDUCED TO ANY ELECTRONIC MEDIUM OR MACHINE-READABLE FORM WITHOUT THE PRIOR WRITTEN CONSENT OF ELECTRONIC ARTS LIMITED, PO BOX 835, SLOUGH, BERKS, SL3 8XP, ENGLAND.
ELECTRONIC ARTS MAKES NO WARRANTIES, CONDITIONS OR REPRESENTATIONS EXPRESS OR IMPLIED, WITH RESPECT TO THIS MANUAL, ITS QUALITY, MERCHANTABILITY OR FITNESS FOR ANY PARTICULAR PURPOSE. THIS MANUAL IS PROVIDED "AS IS". ELECTRONIC ARTS MAKES CERTAIN LIMITED WARRANTIES WITH RESPECT TO THE SOFTWARE AND THE MEDIA FOR THE SOFTWARE. IN NO EVENT SHALL ELECTRONIC ARTS BE LIABLE FOR ANY SPECIAL, INDIRECT OR CONSEQUENTIAL DAMAGES. THESE TERMS AND CONDITIONS DO NOT AFFECT OR PREJUDICE THE STATUTORY RIGHTS OF A PURCHASER IN ANY CASE WHERE A PURCHASER IS A CONSUMER ACQUIRING GOODS OTHERWISE THAN IN THE COURSE OF A BUSINESS.
LIMITED WARRANTY
Electronic Arts warrants to the original purchaser of this computer software product that the recording media on which the software programs are recorded will be free from defects in materials and workmanship for 90 days from the date of purchase. During such period defective media will be replaced if the original product is returned to Electronic Arts at the address on the rear of this document, together with a dated proof of purchase, a statement describing the defects, the faulty media and your return address.
This warranty is in addition to, and does not affect your statutory rights in any way. This warranty does not apply to the software program themselves, which are provided "as is", nor does it apply to media which has been subject to misuse, damage or excessive wear.
RETURNS AFTER WARRANTY.
Electronic Arts will replace user-damaged media, current stocks allowing, if the original media is returned with a Eurocheque or postal order for £7.50 per CD, payable to Electronic Arts Ltd.
Please remember to include full details of the defect, your name, address and, where possible, a daytime telephone number where we can contact you.
Electronic Arts Customer Warranty, P.O. Box 835, Slough, SL3 8XU, UK.

GeneWars is a trademark of Bullfrog Productions Ltd. The Bullfrog logo is a registered trademark of Bullfrog Productions Ltd. Electronic Arts and the Electronic Arts logo are registered trademarks of Electronic Arts. Uses Smacker Video Technology. Copyright (C) 1994 - 1996 by Invisible, Inc. d.b.a. RAD Software. Windows is either a trademark or registered trademark of Microsoft Corporation in the United States and/or other countries.
Extracts courtesy of: Big Aliens From Big Planets (1961, SNP Inc); They Came From Venus (1959, Vivistar Pictures); Killer Babes From Planet Mammarion (1957, WTI); Aliens Attack Paris (1959, AB International); 84 Pilots in Time (1950, Imakon Productions), Mars Is On Fire (1948, PMI); Otherworldly Beings (1958, Unknown); Spacefight at Omichron-5 (Unknown) . Thanks to: The Azure Collection, Ron Howard, Media-Okra Film Archive, Richard Gordon, Medio Multimedia Inc.
32